Installing the Cervelo P5 Disc Tilt-Adjustable Aerobar with No Visible Cables
- Posted on
- By Antonio Gonzalez
- Posted in bicycle repair, bicycle tech
- 10
How to install the Cervelo EX10 tilt-adjustable Speed Riser aerobar with no exposed electronic cables.
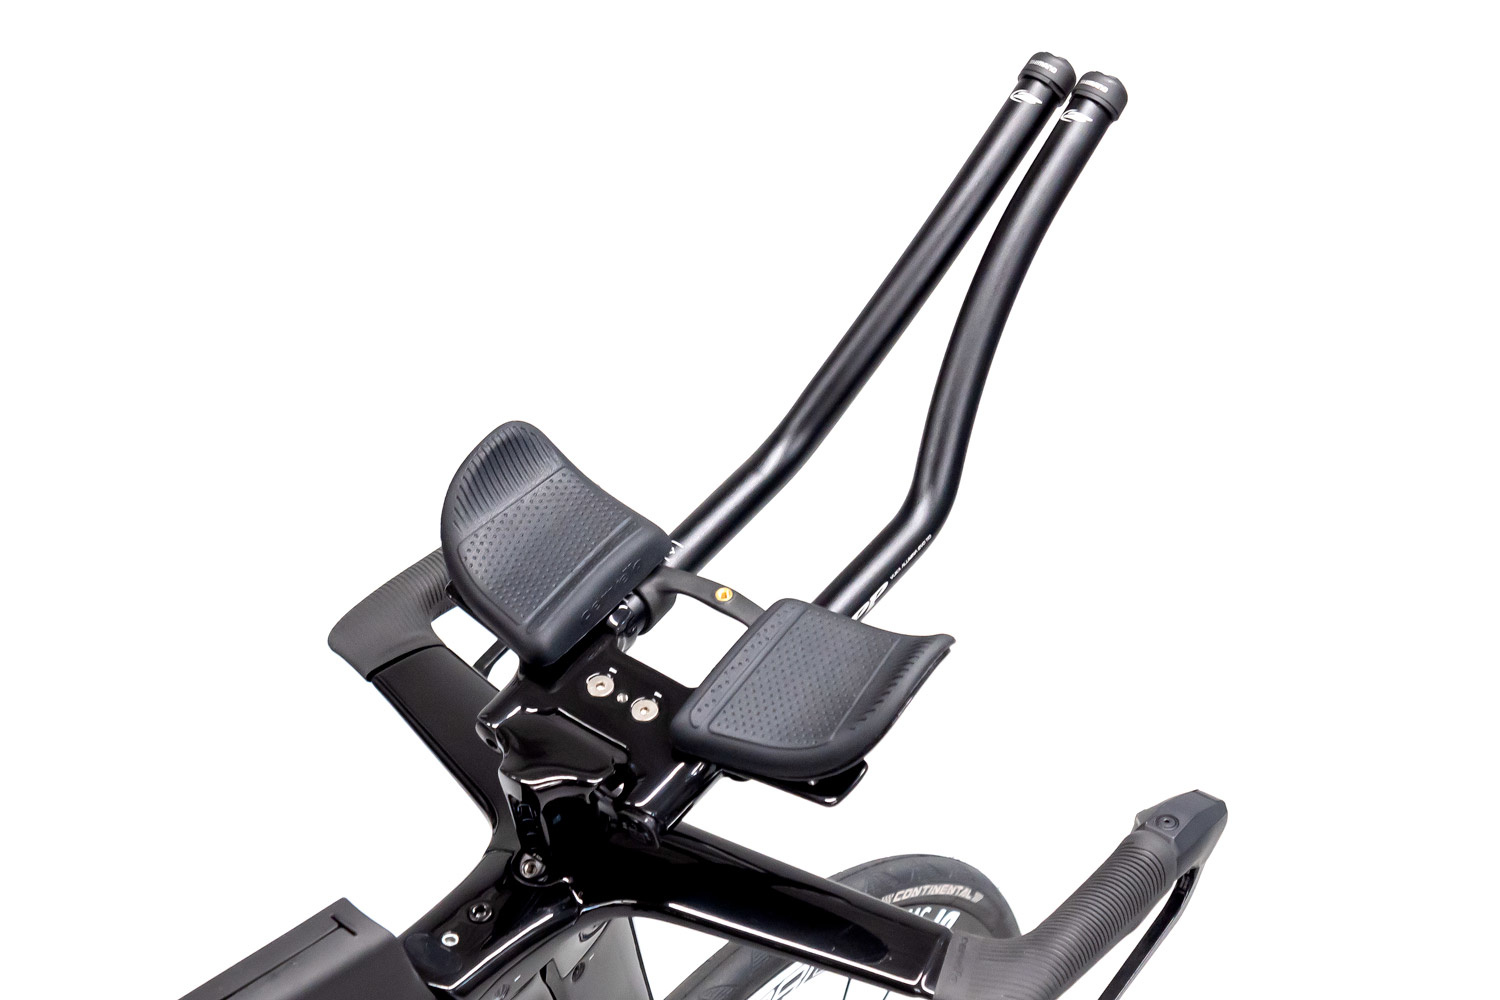
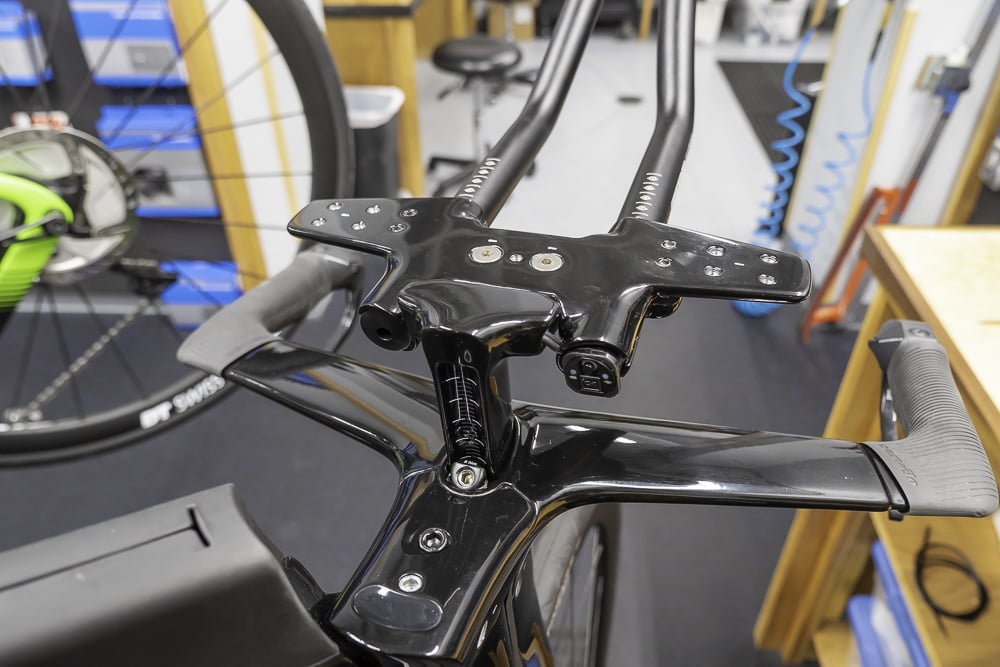
The P5 Disc is an amazing bike- we love the aesthetics, handling, cleanliness, weight of the bike. The only complaint we have is the relatively narrow armrest width and lack of adjustability when it comes to the aerobar's tilt. Fortunately, the "Speed Riser" aerobar found on the Cervelo PX-Series is cross-compatible with the P5 Disc, which provides up to 15 degrees of tilt adjustability and an wider armrest width if desired. The only issue is the standard EX 10 aerobar assembly has the Shimano 2-port Junction Box sit inside the P5's bento box, effectively ruining the clean and cable-free aesthetic the stock P5 Disc aerobar offers.
Below we show a solution to maintain that clean aerobar aesthetic with the EX10 (tilt-adjustable) aerobar installed on the P5. We'll take you through the basic assembly and installation of this cockpit, along with a few of its limitations.
The parts included with the EX10 Conversion Kit are shown on the left side of the image below. You'll need a set of aerobar extensions that are 22.2mm in diameter (the standard aerobar extension size). We used the Zipp Vuka Alumina with 110mm rise, which are some of our favorite aerobar extensions. The rest of the parts needed came with your P5. The good news is you should not need to replace any of the Shimano Di2 parts.

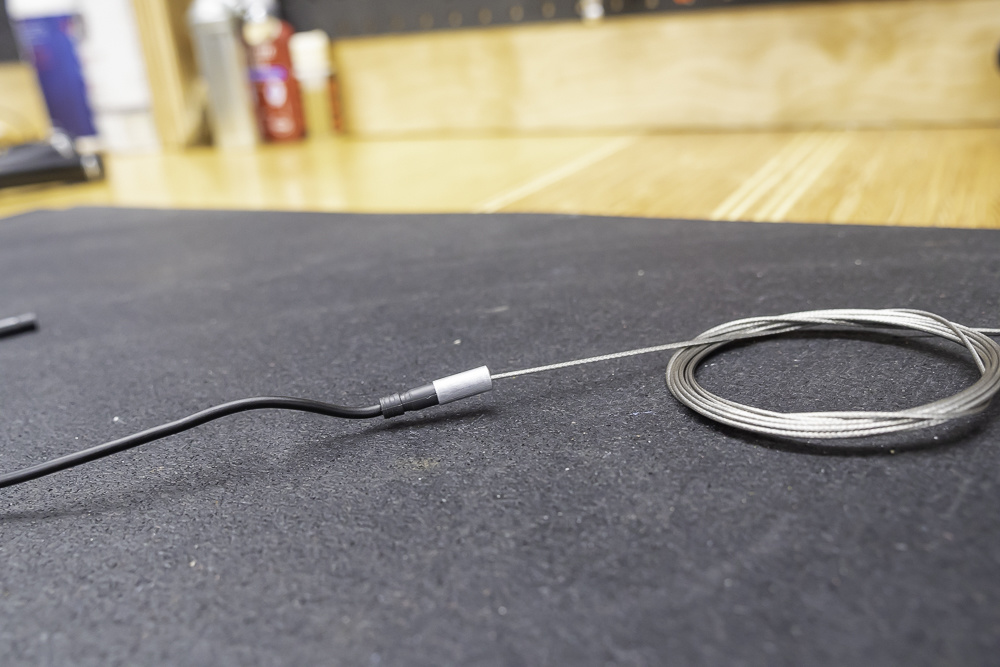
A simple trick that will come in handy throughout this build is to use a derailleur cable with a brake ferrule on the end to 'grab' the eTube and pull it through the component. Ultimately it is much easier to fish a stiff derailleur cable through a component or frame than a flimsy electronic cable.
This setup places the Junction A box in the back of the right aerobar. Reverse these instructions if you want the junction box in the left extension, your choice.
If you need to cut down the Monoriser to achieve your desired armrest height we recommend taking measurements and doing that now. In our example we are not cutting the Monoriser. Start by tracing the single ~400mm E-Tube through the right side of the Monoriser then down through the bottom. A slight bend in the derailleur cable helps guide the cable in the right direction.
This setup requires the Extension and Pad Mount to be in the forward position (read: more arm pad reach). At this time we're not aware of a clean cable routing solution that has the Extension/Pad Mount in the rearward position. We will be setting the EX10 mounting plate in the 15 degree rise position, but you can use whatever rise you prefer, so long as it's either 0, 5, 10, or 15 degrees. Install the Monoriser to the Extension/Pad Mount with the Tilt Adjust Plate and torque the M6 bolts to 6Nm. The first picture simply shows the parts needed (upside down), and the second image shows the parts assembled and temporarily installed on the bike.


Measure and cut the right aerobar to fit so that the back of the aerboar extension extends 3-4cm from the back of the extension/pad mount. The left aerboar can be cut flush with the back of the Extension/Pad Mount, but in this example we cut the two aerobar extensions to the same length. Note: make sure you're happy with your aerobar extension reach and position, this method does not allow for much aerobar extension adjustment once fully installed.

Trace the Shimano Di2 Y-Split Connector through the right aerobar, making sure the split end of the wire exits out the back. Plug the right shifter in at this time. Note the shifters are left and right specific. Look for a small 'R' or 'L' next to the small QR Code located near the top of shifter body.

Install the EX10 bottle mount onto the right aerobar at this time (the bottle mount is not shown in this tutorial). Run the right aerobar through the Extension/Pad Mount and bolt it down with the supplied M5 hardware. Run the long end of the Y-Split Connector through the top of the Monoriser so that it exits the Monoriser's left side.

Install the left aerobar and run the E-Tube through the aerobar. Don't forget to also run the aerobar through the EX 10 bottle mount (not shown). Install the left Di2 shifter. Install an optional handlebar end plug on the left side if you like (you will want to wrap the plug with a couple layers of electrical tape to help it stay in place). The E-Tube should cleanly tuck into the notch above the end plug and not be crushed by the plug.
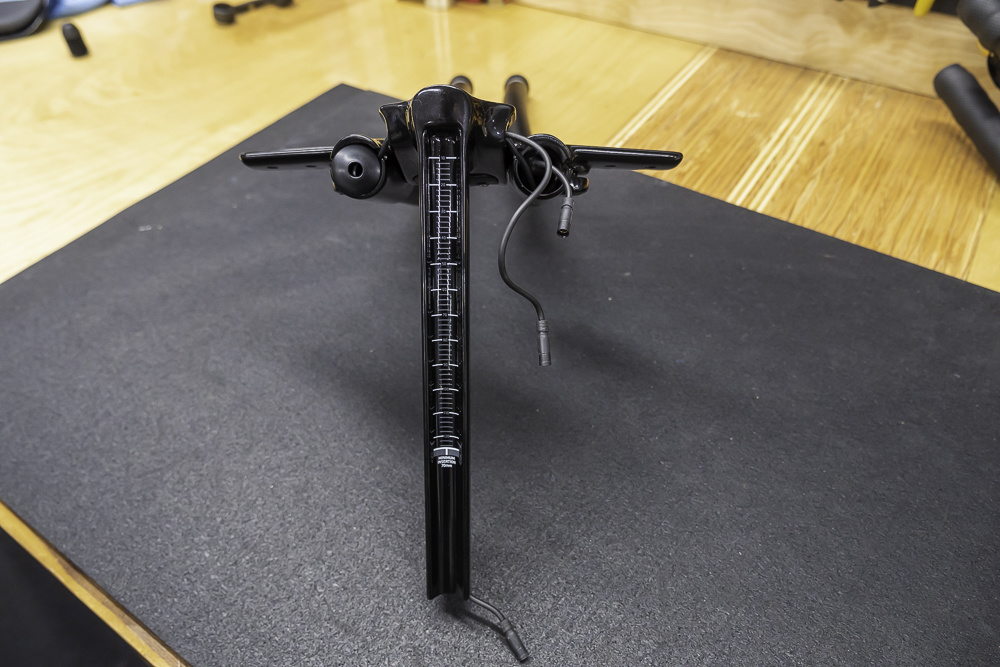
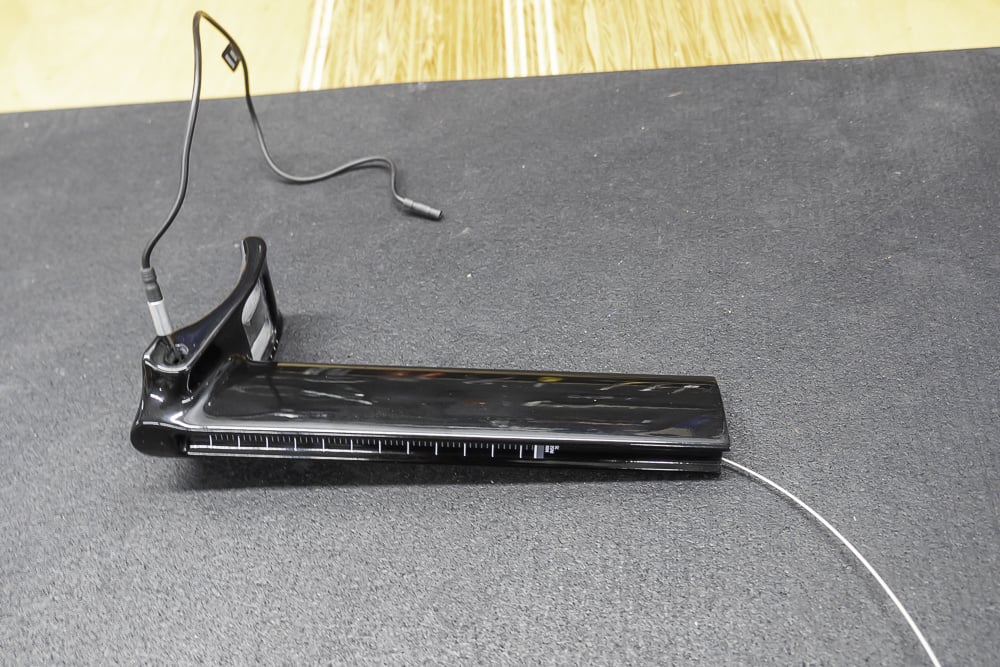
You're now ready to plug the E-Tubes into the 2-port Junction-A Box. Wrap the Junction Box with a couple layers electrical tape. Carefully push the E-Tube wires into the Monoriser or right aerobar extension, and press the Junction Box into the back of the Extension/Pad Mount. The fit will be snug. The E-Tube wires are somewhat fragile so be sure you're not crimping or crushing them.

You're now ready to install the EX10 Aerobar onto your P5 Disc. Reinstall armrest pads in your desired position and bar tape as needed. The end result is clean, comfortable, and more practical than the stock EX11 aerobar.
We hope you enjoyed the tutorial. We'll update this article as we test more configurations. Please feel free to post questions or insights below.
Hi Antonio,<br />
Thanks again for the above responses. Very helpful.<br />
For the pad mount, the pad-holes are relatively wide and I'm finding it hard to create a narrow arm position. <br />
Many alternatives on the market have the pad/cup holes directly above the extensions, which is a material difference.<br />
Do you have any suggestions for creating a narrow elbow position with the EX10 pad mount?<br />
Any help would be greatly appreciated.<br />
Thanks!<br />
Tom
Is it possible to turn the Extension and Pad Mount so that the elbow is closer to the body, or it can be used in one direction?
How high is Monoriser post?
Hello Tom,
The junction box is waterproof, and will not be a problem if it gets rained on, or hosed off occasionally. Just make sure the little Di2 charging port door is closed, and you will be fine.
Here is Shimano's documentation on the Junction Box and what they say re it's water proof properties:
https://si.shimano.com/pdfs/um/UM-71J0A-001-00-ENG.pdf
Thanks for the question!
Antonio G
Hi Antonio.
Thanks for the instructions. Is it fine to ride in the wet with the junction box hanging out of the extension/pad mount as pictured in your last image?
Do you have any suggestions for covering this up (if deemed necessary)?
Thanks a bunch.
Will the set „TILT ADJUSTABLE AEROBAR with Visible Cables work with Cervelo P5 with handlebar 3T Aduro?
Hello Duncan,
I'm using the same junction box. The trick to make this work is to not have the aerobar extension extend all the way to the back of the Extension/Pad Mount. You need to leave about 3-4cm of open room for the junction box and wires to press in there (see image #6 on the blog). Hope this helps! -AG
Hi
What model junction box are you using? I have the EW RS 910 two port and it is too tight to slide it into the bar plus space for the wires to come out
Thanks for the info! I see that the Y-Split comes in 3 lengths...I think you have the longest. I decided to split the length down the mono riser with an inline splitter so that I can easily remove the aero bars when traveling. You said that you can't run the aero bar pads in the "close" position? Any reason for that? Is it that there isn't room for the etube to come out the side of the extension clamp?
Thanks for the help!
Hey Roger,
Thanks for the question: you'll need the Shimano Y-Split E-Tube for the aerobar extensions, which are a set length of about 550mm per side. The only other E-Tube you'll need for the EX10 aerobars is the single wire that runs from the Junction A box down the Monoriser to the Junction B box that sits inside the basebar. I would recommend that this be at least 500mm, but longer is not a bad thing, up to 750mm probably would be fine. Hope this helps!
Love this post! Awesome. Quick question, I am building my bike from the frame up. Any chance you could shoot me the lengths of the etube wires? I know there is some variance, but a rough idea?
Thanks for the help,
Roger Thompson