How to Torque Check the Bolts on Your Bicycle
You've trained for months for your key event. Careful planning and preparation has brought you to the starting line in the best shape of your life. Your transition area is organized with shoes that don't blister your feet, a hat that has molded to your head from hundreds of miles of running, your favorite helmet waits for you atop your triathlon bike. Your bike was recently tuned up by your favorite bike shop before you disassembled it to fit into a travel case. Everything is ready.
Or is it?
They say triathlon is really 4 disciplines: swimming, biking, running, and nutrition. I'll make the argument that it's 5- with planning/logistics being the 5th. Competing in a triathlon can be a logistical nightmare: your balancing training, family, work, flights, hotel, car rentals, racing gear, nutrition, etc. All of this adds stress to an already stressful situation. It's not surprising that sometimes the most basic mistakes are made on race day- you're so busy covering the big ticket items that the small things slip through your fingers.
When it comes to small things the most common mistake we see are athletes forgetting to properly tighten the bolts on their bike before a race. This is especially important if you traveled to your race via plane. Here is a process we train our mechanics to do every time they touch a bike. This technique will virtually eliminating the race-day DNF due to loose or overtightened bolts. It's called the "M-Torque Inspection".
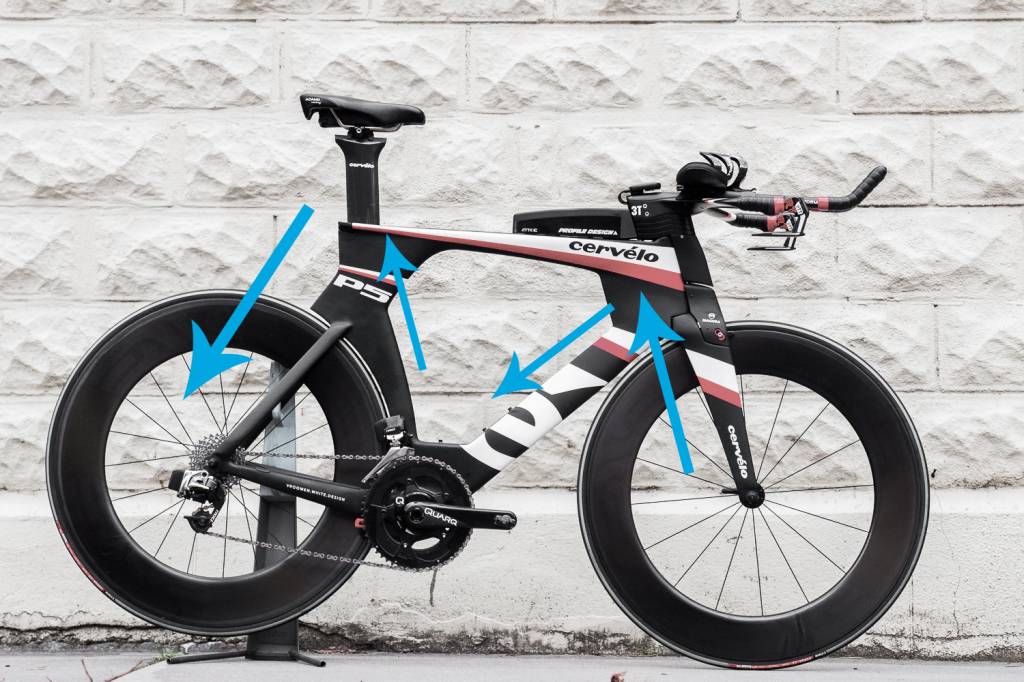
The M-Torque Inspection is a way to systematically check every item and bolt on your bike. You start at the front hub, work your way up the fork to the handlebar/cockpit area, down the downtube to the crank, up the seat tube to the seatpost/saddle, and finally down the seat stays to the rear hub. You in effect follow a reverse "M" pattern. Using your multitool or torque wrench, check every single bolt you come across. Most triathlon bikes will have about 40 bolts in total. With practice, our mechanics can do a full M-Torque inspection in less than 3 minutes. This process has saved thousands of mistakes from rolling out the door, and has helped our service bay maintain a reputation for mechanical excellence. The best part is that you don't have to be a professional mechanic to do this, you'll just need to follow the process with a couple tools.
The Tools:
A well made torque wrench is preferred. If you do not own or have access to a torque wrench, you can use normal wrenches, but be careful of over/under tightening bolts.
Pro Tip:
To avoid overtightening bolts, our mechanics loosen a bolt before re-tightening it with a torque wrench to full spec. This is helpful because a torque wrench only tells you if you have enough torque on a bolt, it does not let you know when a bolt is overly tight. Use a standard hex wrench to loosen the bolts, and avoid using your torque wrench to loosen bolts.
The Process:
- Start at the hub and check the quick release. Is it snug? Is the wheel centered in the fork?
- Moving up the fork: are the brake pad bolts tight? Are the brake mounting bolts tight?
- Moving up to the handlebar/headset: are all the stem bolts tight? Are all aerobar bolts tight? Grab and gently try to rotate the shifters and brake levers... they should not move. Grab the fork with one hand, and the stem with another and gently try to rotate them forward and back- there should be no play in the headset.
- Moving down the bike's down tube: check the water bottle cage bolts (and the top tube bento box if you have one).
- Onto the crank area: Is the front derailleur mounting and cable pinch bolt tight? Are the chainring bolts tight? Are the crank bolts tight?
- Moving up the seat tube to the saddle/seatpost area: Is the seatpost pinch bolt tight (be careful- snug is best or use a torque wrench)? Are the saddle mounting bolts tight? If you have a saddle hydration system check all mounting bolts on it, too.
- Moving down the seat stays: check rear brake pad bolts and mounting bolts. Check the rear derailleur mounting bolts and cable pinch bolts. Finally, is the rear quick release snug? Is the rear wheel straight within the frame?
Air up your tires and you're ready for a test ride. During a test ride you're checking for 3 things:
1. Are the brakes engaging properly and to your liking?
2. Does your bike shift through the full range of gears without issue?*
3. Do you hear any unusual sounds or feel anything unusual?
That's it. Expect this process to take anywhere from 10-30 minutes depending upon your experience. If you find an issue you may be able to take care of it yourself, or at least you caught the problem early and can take it to a qualified mechanic for help. We require our mechanics to go through this process every time they work on a bike. It takes more time, but we feel it's worth the piece of mind and helps maintain our commitment to quality.
* How to do a bicycle shift check:
A bicycle shift check will test ever gear on your bicycle in a methodical way. This is done on the road, and under an honest amount of resistance (hold the brakes gently if needed to create resistance).
Start in the bike's lowest gear (climbing gear). If on flat ground gently squeeze the brakes but continue pedaling, while listening for excessive mechanical rubbing or other sounds. It should be quiet. Shift down the rear cassette one gear at a time. The bike should hit each gear with confidence. Once you have fully cross chained (you may hear mechanical rubbing at this point), shift back up the cassette back to your climbing gears. Again, it should shift relatively quickly and with confidence. Now shift somewhere near the middle of the cassette and shift the front derailleur to the big ring. While pedaling shift the front derailleur relatively quickly up and down a few times. Shift the rear derailleur to a climbing gear and repeat the front derailleur shifts again. Now shift the rear derailleur to a hard gear and try the front shift again.
About the Author:
Antonio Gonzalez is the owner of Tri Town Bicycles in Boise, Idaho. He is a endurance coach, bicycle fitter, and veteran of the cycling and triathlon industry for over 20 years.


